
If you tuned in to Pastor Amos’ video tonight, you heard about the #thiswayoflife Halloween fun we have for you!
Gather your household together and make some fun pumpkin treats and be sure to save one of your pumpkins to carve a #FlatJesus face in it!
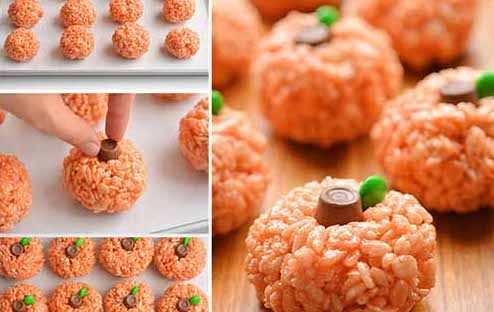
Rice Krispie Treat Pumpkins
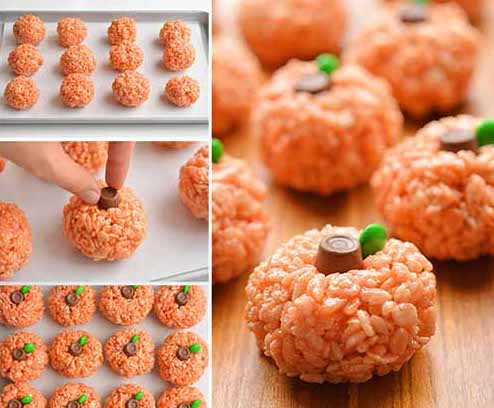
These Rice Krispie Treat Pumpkins are so cute and they’re really easy to make!
PREP TIME: 20 mins TOTAL TIME: 20 mins SERVINGS: 12
Ingredients
- 1/4 cup butter
- 1 bag large marshmallows APPROXIMATELY 40 MARSHMALLOWS
- 6 cups Rice Krispies
- Red & Yellow Liquid Food Colouring
- Mini Rolos
- Green M&M’s
- 1/4 cup cooking oil or melted butter in a small bowl TO KEEP IT FROM STICKING TO YOUR HANDS
- In a large pot, melt the butter over low heat.
- Add the marshmallows and stir until completely melted and combined with the butter.
- Remove from the heat. Add several drops of yellow food colouring, mix it together, then add red food colouring one drop at a time, mixing as you go. Add red/yellow drops until you reach your desired colour. (I used about 4 drops red and 12 drops yellow). Mix well.
- Add the Rice Krispies and stir to combine.
- Coat both sides of your hands with a generous amount of cooking oil or butter, and roll the Rice Krispie mixture into small balls. Set on parchment paper. Add oil/butter to your hands after each ball.
- While the balls are still warm, gently press a Mini Rolo into the top of each pumpkin for the stem and add a green M&M beside it as the leaf. (Tip: If the pumpkins cool before you’re finished, use the end of a thick marker or apple corer to make a small indent in the top for the chocolate to sit in.)
Don’t forget to tag your creations with #thiswayoflife